Instant Pot Oreo Cheesecake: Your Foolproof Ticket to Dessert Glory
Are you someone who freezes up at the mere mention of baking? Does the thought of precise measurements, finicky ovens, and potential cracks in your cheesecake send shivers down your spine? You’re not alone! Many excellent cooks shy away from baking, often assuming that culinary prowess in one area automatically translates to another. But here's a secret: with an Instant Pot, you can ditch the baking anxiety and whip up a truly spectacular dessert that will impress everyone – even yourself. Welcome to the world of the
instant pot oreo cheesecake recipe, where foolproof results are the norm, not the exception.
This isn't just any cheesecake; it's a luscious blend of two universally adored treasures: rich, tangy cream cheese and the iconic chocolatey crunch of Oreos. It’s decadent enough to be the show-stopping centerpiece at any gathering, yet surprisingly simple to create, making it ideal for beginners and seasoned chefs looking for a stress-free dessert solution. If you've been looking for *the* dessert to make you look like a baking pro, this is it.
Why Instant Pot Cheesecake is a Game-Changer for Beginners (and Busy Cooks)
Traditional cheesecake baking can be intimidating. The delicate balance of oven temperature, the dreaded water bath, and the heartbreaking potential for cracks are enough to deter even the most enthusiastic home cooks. This is precisely where the Instant Pot shines, transforming a potentially complex dessert into a remarkably straightforward process.
The magic of the Instant Pot lies in its ability to create a perfectly controlled, moist environment. Inside the sealed pressure cooker, steam circulates evenly around your cheesecake pan, replicating the ideal conditions of a professional steam oven. This constant, gentle steam bath is the secret weapon against common cheesecake woes:
- No More Cracks: The moist environment prevents the cheesecake from drying out and cracking, resulting in a beautifully smooth, pristine top every time.
- Even Cooking: The consistent internal temperature ensures your cheesecake cooks uniformly, from the center to the edges, without overbaking.
- Reduced Stress: Forget constantly monitoring the oven or worrying about temperature fluctuations. The Instant Pot handles the hard work, leaving you to relax.
- Foolproof Results: Even for those of us who tend to cook "by feel" rather than by precise measurements, the Instant Pot is remarkably forgiving, making this instant pot oreo cheesecake recipe incredibly resilient.
It truly eliminates many of the potential pitfalls and stress points of conventional baking, making it a fantastic gateway for anyone wanting to dive into the world of delicious desserts. For a deeper dive into crafting this easy dessert, check out our guide on
Decadent Instant Pot Oreo Cheesecake with Simple Oreo Crust.
Crafting the Perfect Oreo Crust: Simplicity is Key
A significant part of this cheesecake's irresistible charm comes from its glorious Oreo crust. While some recipes might call for added sugar, flour, or other ingredients to create an "Oreo dough," the beauty of this particular
instant pot oreo cheesecake recipe lies in its elegant simplicity: just Oreos and butter. This minimal approach allows the pure, unadulterated flavor of the chocolate cookies to shine through, creating a robust and deeply satisfying base.
Here's how to achieve crust perfection:
- Crush Your Oreos: You'll need about one "sleeve" of Oreos for a standard ¼-inch thick crust in a 7-inch pan. If you crave an extra-thick crust (and who wouldn't?), feel free to double this amount.
- Food Processor Method: For quick and uniform crumbs, a food processor is your best friend. Pulse until fine crumbs form.
- Bag and Bash Method: If you're looking for a bit of stress relief, place Oreos in a sturdy Ziploc bag, seal it, and go to town with a rolling pin or even the bottom of a heavy pan. Pounding Oreos into powder can be surprisingly therapeutic!
- Bind with Butter: Once you have your fine Oreo crumbs, melt some unsalted butter and mix it thoroughly with the crumbs. The butter acts as the binder, holding the crust together.
- Press into Pan: Press the mixture firmly and evenly into the bottom of a 7-inch springform pan. You can use the bottom of a glass or your fingers to create a smooth, compact layer. For a truly professional finish, gently push some crumbs up the sides of the pan to form a slight border.
The simplicity of this crust means you're already halfway to a show-stopping dessert with minimal effort!
The Irresistible Oreo Cheesecake Filling: A Creamy Dream
Once your crust is ready, it's time for the star of the show: the rich, creamy, and undeniably luscious Oreo cheesecake filling. This recipe typically calls for two blocks of full-fat cream cheese, forming the luxurious base that will be studded with more crushed Oreo goodness.
To ensure a smooth, lump-free filling that bakes beautifully:
- Room Temperature Ingredients are Key: This cannot be stressed enough! Ensure your cream cheese, and any other dairy ingredients like eggs or sour cream, are at room temperature. Cold ingredients will lead to lumps and an overmixed batter.
- Mix Smartly: Use an electric mixer (handheld or stand mixer) to beat the cream cheese until smooth and creamy *before* adding other ingredients. Then, gradually incorporate sugar, eggs, and vanilla extract. Beat until just combined – do not overmix! Overmixing introduces too much air, which can cause cracks during cooling.
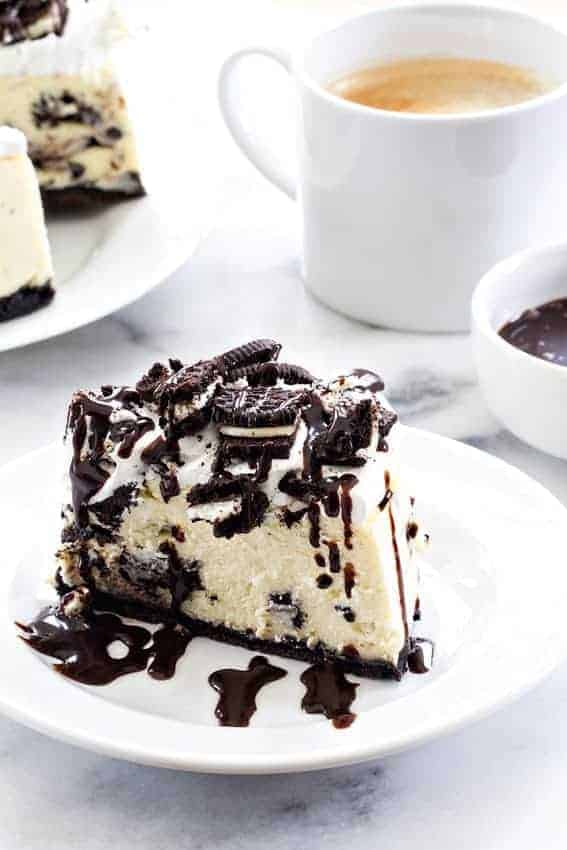
- Fold in the Oreos: Gently fold in coarsely crushed Oreo pieces at the very end. You want distinct chunks to provide texture and bursts of chocolatey flavor in every bite, not just a uniform color.
This combination of textures and flavors is what makes this
instant pot oreo cheesecake recipe truly extraordinary.
Essential Tools and Setup for Your Instant Pot Oreo Cheesecake
While the Instant Pot simplifies the baking process, having the right tools makes the experience even smoother:
- Instant Pot: Any model 6-quart or larger will work.
- 7-inch Springform Pan: Essential for easy removal of your cheesecake. Ensure it fits comfortably inside your Instant Pot with enough room to lift it out.
- Aluminum Foil: For covering the springform pan. This prevents condensation from dripping onto your cheesecake surface during cooking.
- Trivet with Handles: Most Instant Pots come with one. This allows you to easily lower and lift the cheesecake pan into and out of the Instant Pot.
- Measuring Cups & Spoons: Standard baking tools for accuracy.
- Electric Mixer: For blending the cream cheese mixture smoothly.
The setup is straightforward: pour 1 to 1.5 cups of water into the Instant Pot liner, place the trivet, then carefully lower your foil-covered springform pan onto the trivet. Seal the lid, set to high pressure, and let the magic happen!
Make-Ahead Magic: Freezing Your Instant Pot Oreo Cheesecake
One of the fantastic benefits of an Instant Pot cheesecake is its freezer-friendly nature. Whether you’re preparing for a future celebration or simply want to savor every last slice, this
instant pot oreo cheesecake recipe freezes beautifully.
To ensure your cheesecake maintains its perfect texture and flavor after freezing:
- Cool Completely: Allow the cheesecake to cool completely at room temperature, then refrigerate it overnight. This crucial step ensures the cheesecake is fully set and stable before freezing.
- Remove from Pan: Once thoroughly chilled, carefully remove the cheesecake from its springform pan and place it on a cake board or a freezer-safe plate.
- Wrap Tightly: This is key to preventing freezer burn. Wrap the entire cheesecake tightly with several layers of plastic wrap, making sure no edges are exposed. For extra protection, I recommend a double layer of plastic wrap, followed by a layer of aluminum foil.
- Freeze: Your perfectly wrapped cheesecake can now be frozen for 2-3 months without any loss of quality. If you want to store it longer, it's generally best to keep it whole rather than in slices.
When you're ready to enjoy, simply thaw the cheesecake in the refrigerator overnight. You can also wrap individual slices for convenient grab-and-go portions. For more detailed instructions on how to best preserve your delicious creation, read our guide on
Make Ahead Instant Pot Oreo Cheesecake: Freeze & Enjoy Later.
From Pot to Plate: Chilling and Serving Your Masterpiece
The cooking in the Instant Pot is only half the journey; proper chilling is paramount for achieving that classic, dense, and creamy cheesecake texture.
- Natural Pressure Release: Once cooking time is complete, allow a natural pressure release (NPR) for at least 10-15 minutes, or even longer, before carefully venting any remaining pressure. This gentle release helps prevent the cheesecake from collapsing or cracking due to sudden temperature changes.
- Cool to Room Temperature: Carefully remove the cheesecake from the Instant Pot using the trivet handles. Let it cool on a wire rack at room temperature for at least an hour.
- Refrigerate: This is the most crucial step! Transfer the cheesecake (still in its pan) to the refrigerator and chill for a minimum of 6-8 hours, or ideally, overnight. This allows the cheesecake to fully set and firm up, developing its signature rich and creamy consistency.
Once thoroughly chilled, run a thin knife around the edge of the pan before releasing the springform sides. Garnish with a dollop of whipped cream, extra crushed Oreos, or a drizzle of chocolate sauce for an extra touch of decadence.
Indulge in Instant Pot Oreo Cheesecake Perfection
The Instant Pot Oreo Cheesecake is more than just a dessert; it’s a testament to how modern kitchen appliances can demystify complex recipes and empower even the most hesitant bakers. With its foolproof cooking method, delectable Oreo crust, and rich, creamy filling, this
instant pot oreo cheesecake recipe is destined to become a staple in your dessert repertoire. So, go ahead, gather your ingredients, fire up your Instant Pot, and prepare to delight your taste buds – and impress your friends and family – with this truly irresistible treat. Happy baking (without the baking)!